All right, I took a week-long hiatus as we went on an Easter vacation, and I refused to cook! But I'm back, and here's a new creation. Once in awhile, I think that chicken wings add a little fun to dinner, but this glaze would be equally delicious on a whole chicken, chicken pieces, pork chops, fish, and maybe even a good steak.
You Need:
3 lbs. chicken wings
1 c. apricot or peach preserves
1/4 c. balsalmic vinegar
1 T. lemon pepper seasoning
1 T. jarred ginger/garlic mix (or 1/2 T. each)
2 T. olive oil
Scoop about a cup of preserves into a small bowl.
Add the balsalmic vinegar.
Add the lemon pepper, garlic and ginger, and olive oil.
Mix well.
Spray grill with cooking spray, or I like to use two broiling pans sprayed with cooking spray. I do this because sometimes a little wing gets lost in the grill, and that makes me mad!!!
Turn grill to a medium heat and place wings on the pans. Brush the glaze over the wings.
Let cook for about 10 minutes, keeping the heat between medium to medium-low. You don't want the glaze and wings to burn. Brush glaze on 2 more times while cooking on this side. This is what they look like just before you turn them.
Turn each wing over and brush with glaze. Baste 2 more times while cooking for about 10 more minutes.
Remove from grill when cooked through. The juices should run clear if pierced with a knife.
I served these yummy wings with Balsalmic Green Beans, baked potatoes, and homemade Brown Sugar Wheat Bread.
Blog
Wednesday, April 27, 2011
Tuesday, April 12, 2011
Tara's Homemade Hamburger Buns
Ok, you might think that making homemade buns is too much work when you're throwing together a burger, but it's SO worth it. Plus, if you mix the dough while getting ready for work, you can throw it in the fridge, and it will slowly rise during the day. When you get home from work, shape the buns, let rise once more, bake and serve. Not so hard after all!
You Need:
1 T. yeast
1 c. warm milk
1/2 c. sugar
2 eggs
1/4 c. warm water
1 1/2 t. salt
1/2 c. shortening
4 1/2 c. flour
NOTE: I love my KitchenAid Stand Mixer. It makes mixing and kneading dough so easy. I can let it knead while I go do something else, and it always turns out good. However, this can all be done by hand with great results.
Whisk together the yeast and sugar in a bowl. This makes sure the yeast doesn't get wet then stuck to the bottom of the bowl. Add the warm milk and water to the bowl. It should be a bit warmer than lukewarm, but not much. Too hot will kill the yeast. Wait about 5 minutes until the yeast makes the milk foamy.
Add the salt, shortening, and 2 cups of flour to the mixture, and mix until mostly incorporated.
You'll notice there is a picture of Dough Enhancer. I bought this at a Basic Living store and lots of health food stores sell this. It helps the gluten in the dough develop and creates a lighter, fluffier, better bread. If you use it, add 1 Tablespoon of it to the dough now. If not, don't worry about it.
Add the two eggs and mix into the dough.
Add the rest of the flour. Mix in the mixer until fully incorporated. This is where I turn my KitchenAid to a medium-low setting and knead for about 6-7 minutes. If you do this by hand, turn the dough out onto a lightly floured surface. It is a sticky dough. Knead for about 6-7 minutes until smooth and elastic.
Cover the dough in a bowl and let rise in a warm place for about 1 hour or until doubled. It will look like this when raised:
Isn't that pretty?
Punch the dough down. Spray a cookie sheet AND YOUR HANDS with cooking spray. Roll 1/3 cup pieces of dough to form a ball, then place on the cookie sheet. Slightly flatten. Repeat until the dough is used up. I ususally get about 12 rolls.
Cover and let raise again until doubled (about 30-45 minutes). Bake at 350 for 15-20 minutes, or until golden.
Cool and serve with hamburgers. For this meal, we did the hamburgers, Macaroni Salad, and Fruit Salsa with chips.
I couldn't wait to take a picture before I took a bite!!! A fine welcome for summer!
Macaroni Salad
This is one of those feel-good side dishes that tastes so good with summer food, or, if it is winter, it might make you remember what summer was like. It's not hard to make, and it tastes SOOOOOO much better than store-bought.
You Need:
1 lb. package small pasta
1/2 lb. colby jack or cheddar cheese
1 or 2 bell peppers (red, yellow, green, or orange)
5-6 green onions
1 can tuna or small shrimp OR 1/2 lb. cooked ham
2 c. Miracle Whip (Or 1/2 Miracle Whip and 1/2 Mayo)
1 c. honey or dijon style mustard (I use my mom's, Dione's Mustard, email me to find out how to get it.)
1/2 to 3/4 c. sugar
1-2 T. rice vinegar or red wine vinegar
salt and pepper
Cook the pasta according to package directions. Drain in a colander and run cold water over it until the pasta is cold. Drain out as much water as possible. Dice the cheese, peppers, and ham (if using). Slice the green onions. Drain tuna or shrimp (if using). Put all of these ingredients in a large bowl.
In a medium mixing bowl, mix the Miracle Whip, mustard, vinegar, sugar, salt and pepper until the sugar disolves. If it seems to thick, add some milk a 1/4 c. at a time.
Pour the dressing over the macaroni and stir to cover every morsel with dressing.
It is great right then, and even better the next day. I love to serve this with BBQ Ribs, hamburgers, chicken wings, or anything else on the grill!
BBQ Ribs
One of my favorite things about getting out the grill is ribs!!!! I love ribs. So, here is my favorite way to make them. Plan ahead, they need to cook in the oven for about 3-5 hours beforehand
You Need:
1-2 racks of ribs OR 2-3 lbs of Country Style Ribs
1 14 oz can tomato sauce
1/2 cup packed brown sugar
2 T. balsalmic vinegar (or vinegar of your choice)
2 t. liquid smoke
1 can soda-NO DIET (Coke, root beer, cream soda, lemon-lime, ginger ale...)
1 t. salt
1 t. pepper
1-2 T. your favorite BBQ rub (I like Famous Daves, Durkee, and McCormicks)
Mix together everything but the ribs. Taste to make sure it's to your liking. You don't want it too spicy because it has a lot of time to develop while it's cooking.
Spray a large cookie sheet with cooking spray. Lay the ribs on the cookie sheet meat-side down. You want the side with the visible bones and tendons facing up so the meat can absorb all that yummy sauce. Spoon some sauce over the top.
Tightly cover the sheet with tin foil.
Bake at about 250 for 5 hours. (You can up the temperature to 300 or so for a shorter cooking time. The ribs will cook through in about 2 hours, but to make them tender you want 3-5 hours.) Remove from the oven and take the foil off.
Check out the tenderness of these ribs. I am TOUCHING it, not even pulling in the picture below.
Cut the rib racks in half in order to make removing them easier. Preheat your grill to a high heat. Put your favorite BBQ sauce in a bowl and baste onto the bone side of the ribs.
Sweet Baby Ray's is my FAVE!
I use a paintbrush as a baster. It cleans so well, and has lasted way longer than any of my "real" basters. Put the ribs on the hot grill BBQ sauce-side down.
Once on the grill, baste the meat-side. Close the grill cover and let sit for about 2-3 minutes. This is going to caramalize the sauce and give them that nice "bark" on the outside. Turn the ribs to the other side.
Again, let sit for about 3-5 minutes. Then remove to a serving plate. Serve immediately. We like them with Twice Baked Potatoes and a vegetable.
These will make your significant other love you FOREVA!
Labels:
Beef,
Dinner,
Main Course,
Pork,
Sauces
Fruit Salsa
This salsa screams summer to me. I love to make it because I know when I do, I am going to get to BBQ outside. This salsa is fresh, tangy, sweet, spicy, juicy. It has it all. It is good on chips, grilled chicken, fish, seafood. It basically goes with EVERYTHING!
You Need:
1 pineapple
2 mangoes (that's what is already chopped in the bag.)
3 bell peppers (I had red, yellow, and orange)
1 red onion
3 tomatoes
1 jalapeno
1 bunch cilantro
3 fresh limes (I didn't have any, so I had to use bottled)
*I have also used and love to put in kiwi, peach, cucumber, and papaya.*
Dice the pineapple, mango, peppers, onion, and tomatoes into small pieces. Think scoop-able sized pieces. Put in a large mixing bowl.
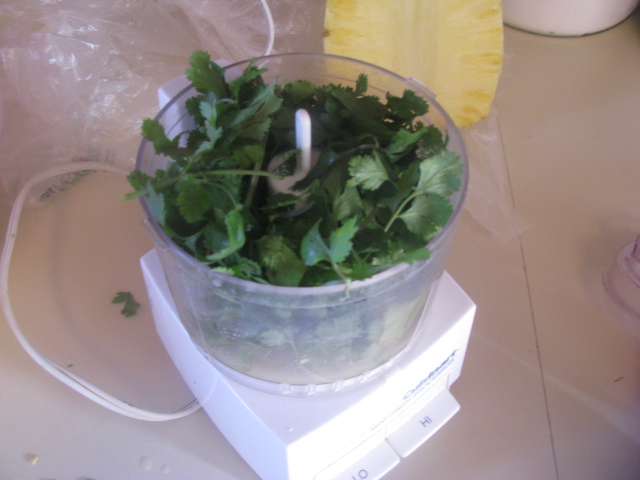
For the next step, I use my mini food processor. Remove the cilantro leaves from the stems as best as you can and stuff them in the food processor. Squeeze the lime juice over the cilantro.
Remove the stem from the jalapeno and slice length-wise. Remove the seeds from the jalapeno (unless you want it HOT, then leave in the seeds). Cut the jalapeno into a couple pieces and put in the food processor.
***NOTE: Cover your hands while working with the jalapeno. I either use disposable latex gloves or I put my hands inside two vegetable bags from the store. Even with protection, wash your hands immediately after chopping the jalapeno, and DO NOT TOUCH YOUR FACE!!***
Blend the ingredients until they are sauce-y. Pour over the top of the fruit and veggies in the bowl. Stir to combine.
Doesn't that look like a colorful bunch of lusciousness???? YUMMY!!!
Subscribe to:
Posts (Atom)